In January I made an attempt to extract a configuration from a Teardrop sample. The initial failures taught me that the most important thing is to get a good sample, although the time spent on the worse ones was not in vain :).
I. Preparation
The day I started my preparation there were not many sources I could rely on. The most knowledge I gained was from this article.
https://research.checkpoint.com/2020/sunburst-teardrop-and-the-netsec-new-normal/
What, in a nutshell, can be learned from it:
- Inside the binary, the next stage is encrypted.
- A (let’s say) custom cipher is used for encryption.
- The key is hardcoded inside.
- The next stage is called Cobalt Strike BEACON.
It’s also a good idea to start by confirming if you’re sure you have a good sample.
yara -s APT_Dropper_Win64_TEARDROP_2.yar <filename>By the way we get an offset on which yara hit, which I found very useful.
0x3337a:$loc_5551D726F6: 53 4F 46 54 57 41 52 45 C7 44 24 40 66 74 5C 43 C6 44 24 46 00II. Decryption
The authors of the post discussing decryption included such a screenshot.

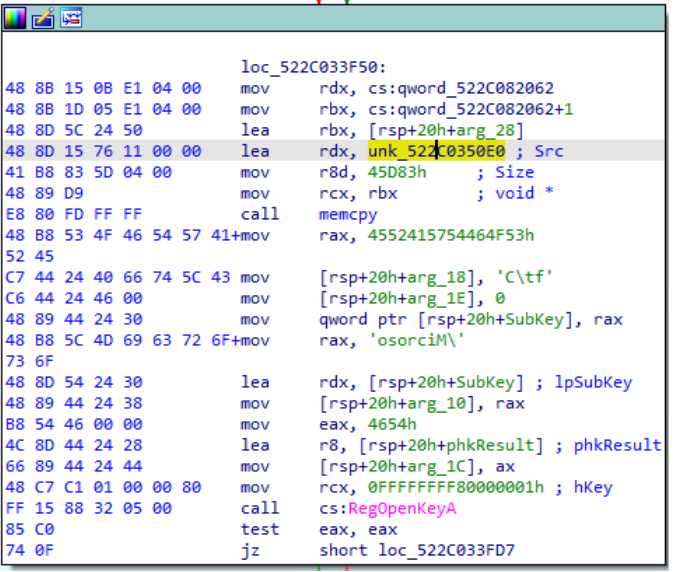
So I decided to find this fragment in my sample. You can search for hit bytes from yara, I decided to find a way to calculate the address to jump under it in IDA. I came up with something like this.
ADDR = IMAGE_BASE + section_1_virt_addr - offset_to_raw_data_for_section + YARA_OFFSETIn my case, it was like this.
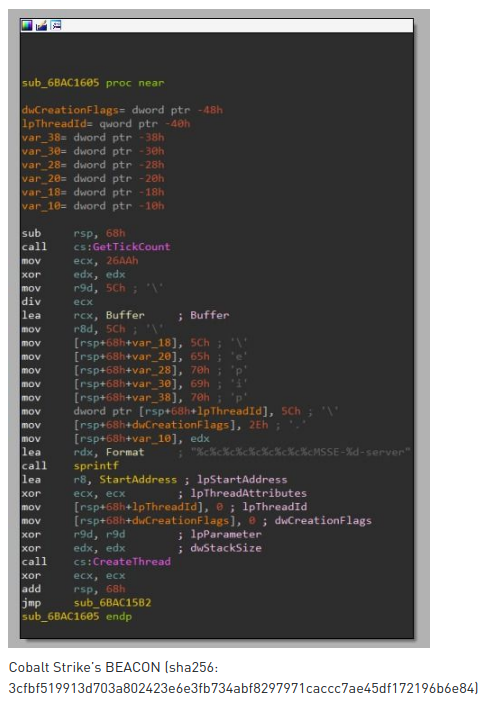
ADDR = 0x522C000000 + 0x1000 - 0x400 + 0x3337a = 0x522C033F7AI jumped to the address, looked around and found it. The first call under RegOpenKeyA is a function that decrypts the payload. I called it mw_decrypt_payload.

Research checkpoint throws up a Python script to decrypt the payload.
CTXT_START_OFFSET = 0x30
KEY_LENGTH = 0x96
PREV_CTXT_BYTE_INITIAL_DEFAULT = 0xcc
prev_ctxt_byte = PREV_CTXT_BYTE_INITIAL_DEFAULT
for i, ctxt_byte in enumerate(ciphertext[CTXT_START_OFFSET:]):
    ptxt_byte  = ctxt_byte ^ (prev_ctxt_byte ^ key[i % KEY_LENGTH])
    plaintext[i] = ptxt_byte
    prev_ctxt_byte = ctxt_byte
…
So, what do we need to make it work:
- CTX_ADDR
- CTX_LEN
- KEY_ADDR
- KEY_LEN
- CTXT_START_OFFSET
CTX_ADDR
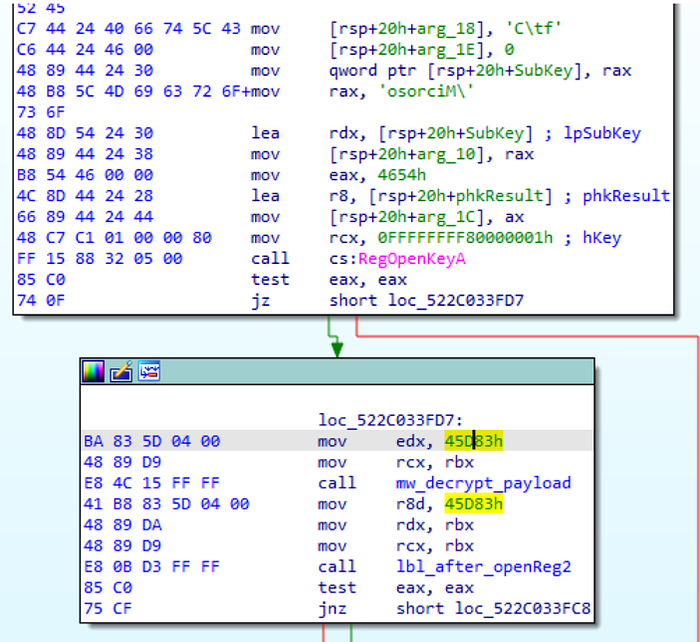
The ciphertext address can be found a little above the RegOpenKeyA function.
CTX_LEN
The ciphertext length goes into the edx register just before the decryption function is executed.
KEY_ADDR
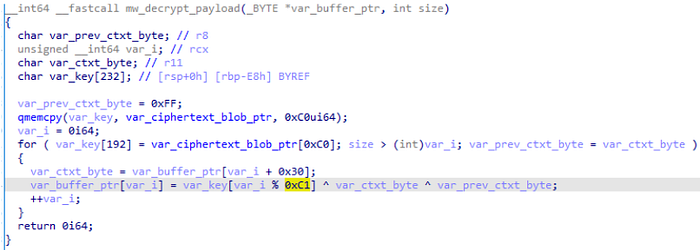
The key address is read inside the mw_decrypt_payload function.

KEY_LEN & CTXT_START_OFFSET
The key length and offset are easy to read using the decompiled code in the for loop.
The data I read:
CTX_ADDR = 0x522C0350e0
CTX_LEN = 0x45D83
KEY_ADDR = 0x522C035000
KEY_LEN = 0xC1
CTXT_START_OFFSET =0x30
I modified the code a bit, so that I could run it directly in IDA, to this form.
import idc
import ida_bytes
CTX_ADDR = 0x522C0350e0
CTX_LEN = 0x45D83
KEY_ADDR = 0x522C035000
KEY_LEN = 0xC1
CTXT_START_OFFSET =0x30
PATH = 'C:\\Users\\IEUser\\Desktop\\stage2_decrypted.bin'ciphertext = idc.get_bytes(CTX_ADDR, CTX_LEN)
key = idc.get_bytes(KEY_ADDR,KEY_LEN)
plaintext=[0] * len(ciphertext)
KEY_LENGTH = 0x96
PREV_CTXT_BYTE_INITIAL_DEFAULT = 0xcc
prev_ctxt_byte = PREV_CTXT_BYTE_INITIAL_DEFAULTfor i, ctxt_byte in enumerate(ciphertext[CTXT_START_OFFSET:]):
    ptxt_byte  = ctxt_byte ^ (prev_ctxt_byte ^ key[i % KEY_LENGTH])
    plaintext[i] = ptxt_byte
    prev_ctxt_byte = ctxt_bytewith open(PATH,'wb') as f:
    f.write(bytes(plaintext))
…
With that I decrypted the payload and saved it to the desktop.
III. BEACON, but are you sure ?
The last item in the cited article is a comparison of the decrypted fragment and BEACON’s payload.
Again same problem, how to trace what article in my sample? Here I used a trick. On both screenshots I found a repeating sequence:
xor r9d, r9d
xor edx, edx
I found a tool that from the given assembler instructions will return me their values in HEX.
https://defuse.ca/online-x86-assembler.htm
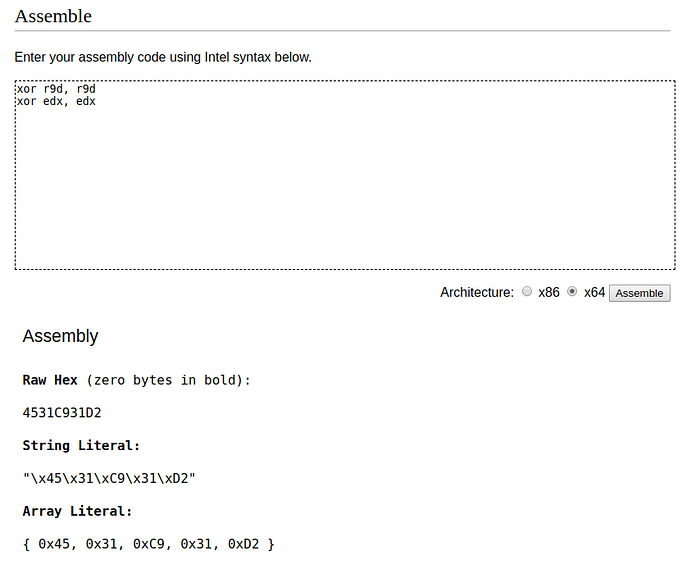
And with that, I found the fragment at my place. That was the end of the restoration work from the Checkpoint article. For the next steps I needed new knowledge and just at that time an article from Microsoft came out. https://www.microsoft.com/security/blog/2021/01/20/deep-dive-into-the-solorigate-second-stage-activation-from-sunburst-to-teardrop-and-raindrop/
I found out that what I have is not yet BEACON, but a so-called Artifact Kit.
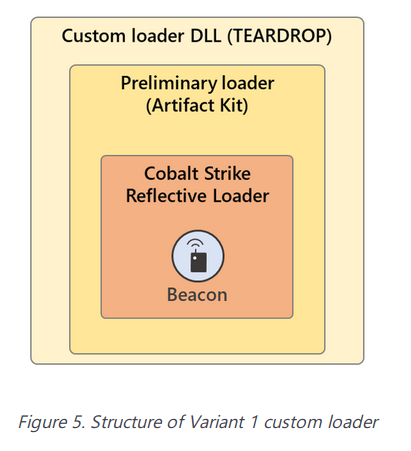
Deepening my knowledge of Cobalt Strike from another excellent article I got new tips.
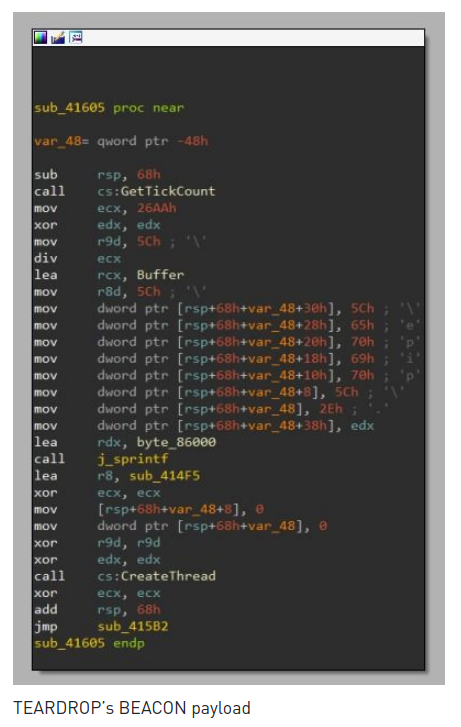
This pipe is decrypted using a rolling XOR against the data. The default XOR key for this particular payload is 0xE3F4C314. After decryption is complete, another thread is created that immediately jumps to and executes the shellcode (Figure 13).Inside the payload I decrypted is another payload, most likely encrypted with a 4-byte key, using XOR. How to discover the key? I found the xortool utility useful. Just enter the length of the key (4), the most common byte in the plaintext (0x00) and voilà!
xortool -l 4 -c 00 <nazwa_pliku>1 possible key(s) of length 4:
'\xaf\x9f\xd0\xec
Found 0 plaintexts with 95%+ valid characters
See files filename-key.csv, filename-char_used-perc_valid.csv
By the way, the tool immediately performed XOR operations with the proposed key and placed the resulting file in the folder xortool_out.
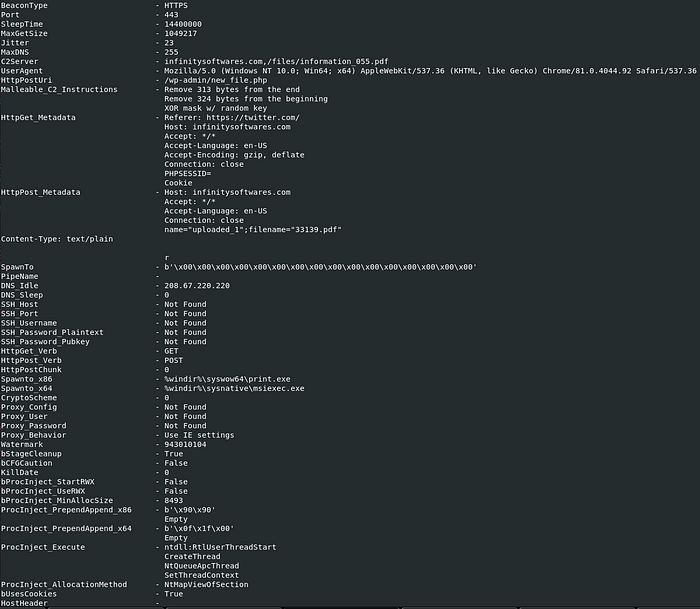
IV. Yeah, that’s BEACON!
The last and most enjoyable step is to find and use a tool that can parse BEACON configurations e.g. such
https://github.com/Sentinel-One/CobaltStrikeParser
A simple command
python3 parse_beacon_config.py <filename>And there you have it, the Teardrop config :).
As you can see, once you know what to do the whole process is very easy, in the near future I plan to automate this process so the config can be obtained with one script.
Thanks and till next time :)!
